
Why You're Overthinking Background Agents
If you can run your system locally on your machine, you can have background agents that anyone at your company can use to ship features from Slack.
That’s really the bar. Can you docker compose up and see your app running? Then you’re 90% of the way there.
At Ranger, anyone can mention @yogi in Slack with a bug or a feature request. From there an AI agent spins up, writes the code, pushes it to a PR for human review, and posts back with a summary. All in all, it’s about 500 lines of infrastructure glue. No more worrying about worktrees or keeping your laptop awake — full isolation and always-on compute.
Before jumping in, I want to address why we built this. Overall it’s mostly infrastructure that your agents can use whether they are Claude Code on the Web, Cursor Background agents, or OpenCode and Slack like we did.
For us, bringing agents into Slack opened the door to everyone at the company and was one less context switch to get work rolling. Looking forward, it allows us full customization of data-setup, infrastructure pieces, and expose any pieces to a HITL without vendor lock-in. Finally, most of this set-up was helpful for human written PRs (gasp) — there is an incredible amount of overlap in automatically getting your full app running on any given PR for you and your teammates to kick the tires of your change.
With that, let’s jump into a walkthrough of how we did it at our GCP shop. Note that other than Google’s IAP, everything else would directly port over to AWS, Azure, or wherever you choose to ship and even that can be easily replaced with Tailscale. From here on out, this is a “how to” with notes along the way about trade-offs.
Part 1: Get a Box
You need compute — this has to run somewhere persistent
gcloud compute instances create preview-pr-${PR_NUMBER} \
  --machine-type=e2-standard-8 \
  --boot-disk-size=50GB \
  --boot-disk-type=pd-ssd \
  --image=preview-nightly-latest \
  --tags=preview-env \
  --no-address  # Internal IP only for security
Key decisions:
- e2-standard-8: 8 vCPUs, 32GB RAM. Agents plus a browser takes a lot of ram. Don’t skimp if you have a UI that you want to be able to iterate against.
- 50GB SSD: Fast disk matters for npm installs and builds.
- No external IP: We route through IAP (Identity-Aware Proxy) and this drastically limits the attack surface.
- Custom image: We build a
preview-nightly-latestimage with Node, Docker, nginx pre-installed to make the boot time fast.
The VM costs ~$0.27/hour. A background agent session usually lasts 15-30 minutes but we keep the boxes up as long as the related PR is open. Even if it stays up for 2 days, you can do the math — it rounds to free.
Part 2: Docker Compose + nginx
On the box, we run everything through Docker Compose. nginx sits in front and routes by subdomain:
pr2901-api.preview.ranger.net      → :3000 (API)
pr2901-dashboard.preview.ranger.net → :4000 (Frontend)
pr2901-opencode.preview.ranger.net  → :4096 (OpenCode Web UI)
nginx config is simple:
server {
  listen 80;
  server_name ~^pr(?<num>\d+)-api\.preview\.ranger\.net$;
  location / { proxy_pass http://localhost:3000; }
}
Health check endpoint (/health) is critical — GCP load balancer needs to know when your services are ready.
Part 3: DNS + IAP (The Security Layer)
Google Cloud DNS handles *.preview.ranger.net with a wildcard A record pointing to our load balancer.
Identity-Aware Proxy (IAP) is where the magic happens:
# Enable IAP on the backend service
gcloud compute backend-services update preview-backend-pr-${PR_NUM} \
  --iap=enabled \
  --global

# Grant access to your domain
gcloud iap web add-iam-policy-binding \
  --resource-type=backend-services \
  --service=preview-backend-pr-${PR_NUM} \
  --member="domain:ranger.net" \
  --role="roles/iap.httpsResourceAccessor"
Now only people with @ranger.net Google accounts can access preview environments. No VPN setup. No SSH keys to manage. Just Google auth.
SSH access also goes through IAP:
gcloud compute ssh preview-pr-2901 --zone=us-central1-a --tunnel-through-iapNo bastion hosts. No public IPs. IAP tunnels everything.
Part 3b: Alternative — Tailscale
Not on GCP? Don’t want to mess with load balancers and IAP? Tailscale gets you 90% of the security with 10% of the setup.
Tailscale is a mesh VPN built on WireGuard where every device on your tailnet gets a stable IP address, and traffic is encrypted end-to-end.
Setup on the Preview Instance
# Install Tailscale (one line)
curl -fsSL https://tailscale.com/install.sh | sh

# Authenticate with your org's tailnet
# Use an auth key for unattended setup in CI
tailscale up --authkey=${TAILSCALE_AUTH_KEY} --hostname=preview-pr-${PR_NUMBER}
That’s it. Your preview instance is now on your company’s private network.
Access from Anywhere
Anyone on your tailnet can now reach the preview:
http://preview-pr-2901:3000  # API
http://preview-pr-2901:4000  # Dashboard
http://preview-pr-2901:4096  # OpenCode
Tailscale handles DNS automatically — the hostname resolves to the tailnet IP.
SSH Without Keys
Tailscale SSH means no SSH keys to manage:
# Enable Tailscale SSH on the instance
tailscale up --ssh

# Connect from any machine on your tailnet
ssh preview-pr-2901
Your identity is your Tailscale login. No authorized_keys, no key rotation, no bastion hosts.
MagicDNS + HTTPS
Want real URLs? Tailscale’s MagicDNS gives you:
https://preview-pr-2901.tail1234.ts.netAdd Tailscale’s HTTPS certificates and you get valid TLS with zero config:
tailscale cert preview-pr-2901.tail1234.ts.netAccess Control
Tailscale ACLs control who can reach what:
{
  "acls": [
    {
      "action": "accept",
      "src": ["group:engineering"],
      "dst": ["tag:preview:*"]
    },
    {
      "action": "accept",
      "src": ["group:product"],
      "dst": ["tag:preview:4000"]  // Dashboard only
    }
  ]
}
Engineering gets full access. Product can see the dashboard but not SSH in.
Why Choose Tailscale Over IAP?
| IAP | Tailscale | |
|---|---|---|
| Setup complexity | Medium (GCP-specific) | Low (works anywhere) |
| Cloud lock-in | GCP only | Any cloud, bare metal, your laptop |
| SSH access | IAP tunnel required | Native SSH |
| Cost | Free (GCP feature) | Free for small teams, paid for larger |
| DNS | Requires Cloud DNS setup | MagicDNS built-in |
| Mobile access | Browser only | Native apps |
Our take: If you’re already on GCP with Google Workspace, IAP is cleaner. If you’re multi-cloud, on AWS, or want something that “just works,” Tailscale wins.
The One-Liner for CI
# In your GitHub Actions workflow
curl -fsSL https://tailscale.com/install.sh | sh && \
  tailscale up --authkey=${{ secrets.TAILSCALE_AUTH_KEY }} --hostname=preview-pr-${{ github.event.pull_request.number }}
Your preview instance joins the tailnet, engineers can reach it immediately, and when the PR closes, just tailscale logout or delete the instance.
Part 4: Get Your Code on the Box (With Push Permissions)
The best way to do this is to create a Github App and use per-repo permissions, limiting scope as much as possible. However, if you have a higher risk-appetite or just want to get there ASAP, you can use a GitHub Personal Access Token (PAT) with repo scope. Either way, this is some of the magic config that makes it an end-to-end agent — the agent needs to be able to push commits back to the PR branch.
# Clone with the Access token / PAT baked in (agent can push without prompts)
git clone https://${GITHUB_TOKEN}@github.com/your-org/your-repo.git
git checkout ${BRANCH_NAME}
We also configure git credentials on the box so the agent doesn’t get stuck:
git config --global credential.helper store
echo "https://${GITHUB_TOKEN}:x-oauth-basic@github.com" > ~/.git-credentials
Now when the agent runs git pull or git push, it just works. No SSH keys to manage, no credential helpers to configure.
Part 5: Database for Preview Environments
Every preview environment needs its own database. The agent (likely) can’t share a database with other agents — they’d step on each other’s data.
Our Approach: Postgres Branching
We use Neon for this but it’s a competitive space with options like Dolt as well — use whatever works best for you.
Being able to fork Postgres is game changing for agents. For our forks we carefully scrub the data that gets into the root Postgres — you may not need this depending on your data shape, but it makes us sleep better at night.
Here’s how we create a branch for each PR:
# Create the branch via Neon API
curl -X POST "https://console.neon.tech/api/v2/projects/${NEON_PROJECT_ID}/branches" \
  -H "Authorization: Bearer ${NEON_API_KEY}" \
  -H "Content-Type: application/json" \
  -d '{
    "branch": { "name": "pr-2901", "parent_id": "br_main" },
    "endpoints": [{ "type": "read_write" }]
  }'
Or use their GitHub Action (simpler):
- uses: neondatabase/create-branch-action@v6
  with:
    project_id: ${{ secrets.NEON_PROJECT_ID }}
    branch_name: pr-${{ github.event.pull_request.number }}
    api_key: ${{ secrets.NEON_API_KEY }}
    database: ranger
    expires_at: "2024-02-26T00:00:00Z"  # Auto-delete after 7 days
Key insight: We set expires_at to 7 days in the future. Neon automatically deletes the branch after the PR is stale. No cleanup scripts needed.
Running Migrations on the Branch
The branch starts as a copy of our root testing data, but you need to apply any new migrations from the PR:
# Get the branch's connection URL
BRANCH_RESPONSE=$(curl -s -X GET \
  "https://console.neon.tech/api/v2/projects/${NEON_PROJECT_ID}/connection_uri?branch_id=${BRANCH_ID}&database_name=${DB_NAME}&pooled=true" \
  -H "Authorization: Bearer ${NEON_API_KEY}")

DB_URL=$(echo "$BRANCH_RESPONSE" | jq -r '.uri')

# Run migrations (we use goose, but any migration tool works)
docker run --rm --network=host \
  -v $(pwd)/migrations:/migrations \
  -e GOOSE_DRIVER=postgres \
  -e GOOSE_DBSTRING="$DB_URL" \
  gomicro/goose:latest goose up
Now the preview environment has:
- A realistic set of data (for us this means customers, tests, and test results)
- The latest schema from this PR’s migrations
Cost: Neon charges for compute time and storage delta (what changed from parent). For tens of preview branches that live a few days each, we net out at a few hundred dollars a month, but for us, it’s money well spent.
Alternatives If You Don’t Want Postgres Branching Services
Option B: Seed Script
psql $DATABASE_URL < seeds/development.sqlIt can take time to make sure that you have a good seed set but if you already have one, no reason to not just get running with that. It’s simple but has a higher ongoing maintenance cost.
Option C: Shared Dev Database
Everyone points at the same dev DB. If it’s right for your application (e.g. some sort of append only log type data without many migrations), then no need to get fancy — just have all your agents share a dev DB.
Part 6: Safeguarding your application layer
While you can control the data you give your agents, sometimes you want an extra layer of safety to make sure that it doesn’t actually email a customer. If it posts to Slack, it might message a real channel. Oops.
The fix is a single environment variable and ~100 lines of code.
The SANDBOX_ENV Flag
# In your preview environment
export SANDBOX_ENV=true
Every service that talks to the outside world checks this flag:
// src/lib/notifier/processor.ts
if (Environment.SANDBOX_ENV) {
    appendToNotificationOutbox(entry);
    return;
}
// ... actual notification logic
The Notification Pattern: notifications_outbox.txt
Instead of sending notifications, we write them to a local file:
// src/lib/notifier/sandboxOutbox.ts
const OUTBOX_FILENAME = 'notifications_outbox.txt';

export function appendToNotificationOutbox(entry: SandboxNotificationEntry): void {
    const outboxPath = path.join(process.cwd(), OUTBOX_FILENAME);
    fs.appendFileSync(outboxPath, formatOutboxEntry(entry) + '\n');
}
The file looks like this:
[2024-02-19T14:32:01Z] SLACK: channel=C12345 | MESSAGE: Test run completed for acme-corp
[2024-02-19T14:32:05Z] GITHUB_PR_COMMENT: UPSERT owner/repo#42 | BODY: ✅ All tests passing
[2024-02-19T14:33:12Z] TARGET: email (user@acme.com) | ORG: Acme Corp | EVENT: test_failed | MESSAGE: ...
The agent can read this file to verify its work. “Did I send the right Slack message?” Check the outbox. The agent sees exactly what would have happened without actually doing it.
What We Don’t Protect (Intentionally)
- Database writes: The agent needs to modify data to test features
- Browser interactions: Playwright tests hit real URLs — that’s the point
- Git operations for coding agents: We’ll write more about this later!
The sandbox protects against accidental side effects, not the core work.
The Auto-Detection Trick
If you do go down the path of using Neon like us, you can also auto-enable sandbox mode when we detect a Neon database URL:
// src/lib/environment/index.ts
if (hasNeonDatabase && !envData.SANDBOX_ENV) {
    console.warn('[Environment] Detected Neon database URL - forcing SANDBOX_ENV=true');
    envData.SANDBOX_ENV = true;
}
Neon branches = preview environment = sandbox mode. Make sure you can’t forget to set it.
Why This Matters
While we try our best to control the data going into the agent, without this, our background agent might:
- Post to a real Slack channel
- Create a GitHub check on a real PR
With SANDBOX_ENV, agents can safely run against any data without accidentally escaping the box. What this looks like is specific to your application but it’s worth it to make sure your sandboxed agents are actually in the sandbox.
Total code: ~100 lines of sandbox checks + outbox writer.
Part 6: OpenCode — The Web UI for Claude Code
This is where it gets fun. OpenCode gives you a web interface to Claude Code. You can watch the agent think, see it run commands, and even take over mid-session.
Installing OpenCode
# On the preview instance
npm install -g opencode
Starting the Server
We run a persistent OpenCode session — that’s really all it takes to have an interactive agent.
Configuring the API Key
OpenCode exposes an API for configuration. We hit it from our GitHub Actions workflow:
# Wait for OpenCode to be ready
for i in {1..20}; do
  HTTP_CODE=$(curl -s -o /dev/null -w '%{http_code}' 'http://localhost:4096/global/health')
  if [ "$HTTP_CODE" = "200" ]; then
    echo "OpenCode is ready!"
    break
  fi
  sleep 5
done

# Configure the Anthropic API key
curl -s -X PUT http://localhost:4096/auth/anthropic \
  -H 'Content-Type: application/json' \
  -d '{"type":"api","key":"${ANTHROPIC_API_KEY}"}'
Kicking Off a Session Programmatically
Here’s the actual script we use to start an agent session from a PR:
# Create a new session
SESSION_RESPONSE=$(curl -s -X POST "http://localhost:4096/session" \
  -H 'Content-Type: application/json' \
  -d '{"title": "PR #2901: Fix login button on mobile"}')

SESSION_ID=$(echo "$SESSION_RESPONSE" | jq -r '.id')

# Send the prompt (PR body becomes the task)
curl -s -X POST "http://localhost:4096/session/${SESSION_ID}/prompt_async" \
  -H 'Content-Type: application/json' \
  -d '{"parts": [{"type": "text", "text": "'"${PR_BODY}"'"}]}'
Now you can open https://pr2901-opencode.preview.ranger.net/ in your browser and watch the agent work in real-time. You’ll see every file it reads, every command it runs, every commit it makes.
Part 7: Slack Trigger — Everyone Can Ship
Here’s where background agents stop being an eng toy and become a team superpower.
Our Slack bot is dead simple:
// app.ts
import { App } from '@slack/bolt';

const app = new App({
    token: process.env.SLACK_BOT_TOKEN,
    socketMode: true,
    appToken: process.env.SLACK_APP_TOKEN,
});

app.message(createBackgroundAgent);
await app.start();
When someone @mentions the bot with a task:
// createBackgroundAgent.ts
export async function createBackgroundAgent({ say, event }) {
    const userMessage = event.text;

    // Create a draft PR with the message as the prompt
    const result = await createBackgroundAgentPR({
        branchName: `feat/slack-${Date.now()}`,
        title: `agent: ${truncate(userMessage, 50)}`,
        body: userMessage,  // The full message becomes the task
    });

    // These labels trigger the preview environment workflow
    await octokit.issues.addLabels({
        issue_number: result.prNumber,
        labels: ['preview', 'background-agent'],
    });

    await say({
        text: `On it! Background agent dispatched.\nPR: ${result.prUrl}`,
        thread_ts: event.ts,
    });
}
The magic: Adding preview + background-agent labels triggers the GitHub workflow. The workflow spins up the VM, clones the code, starts OpenCode, and passes the PR body as the initial prompt.
Thread context: We also grab the last 50 messages from the Slack thread and include them in the prompt. The agent has full conversation context — including any back-and-forth discussion.
Why This Matters: It’s Not Just for Engineers
Product managers can file feature requests and have working PRs by end of day:
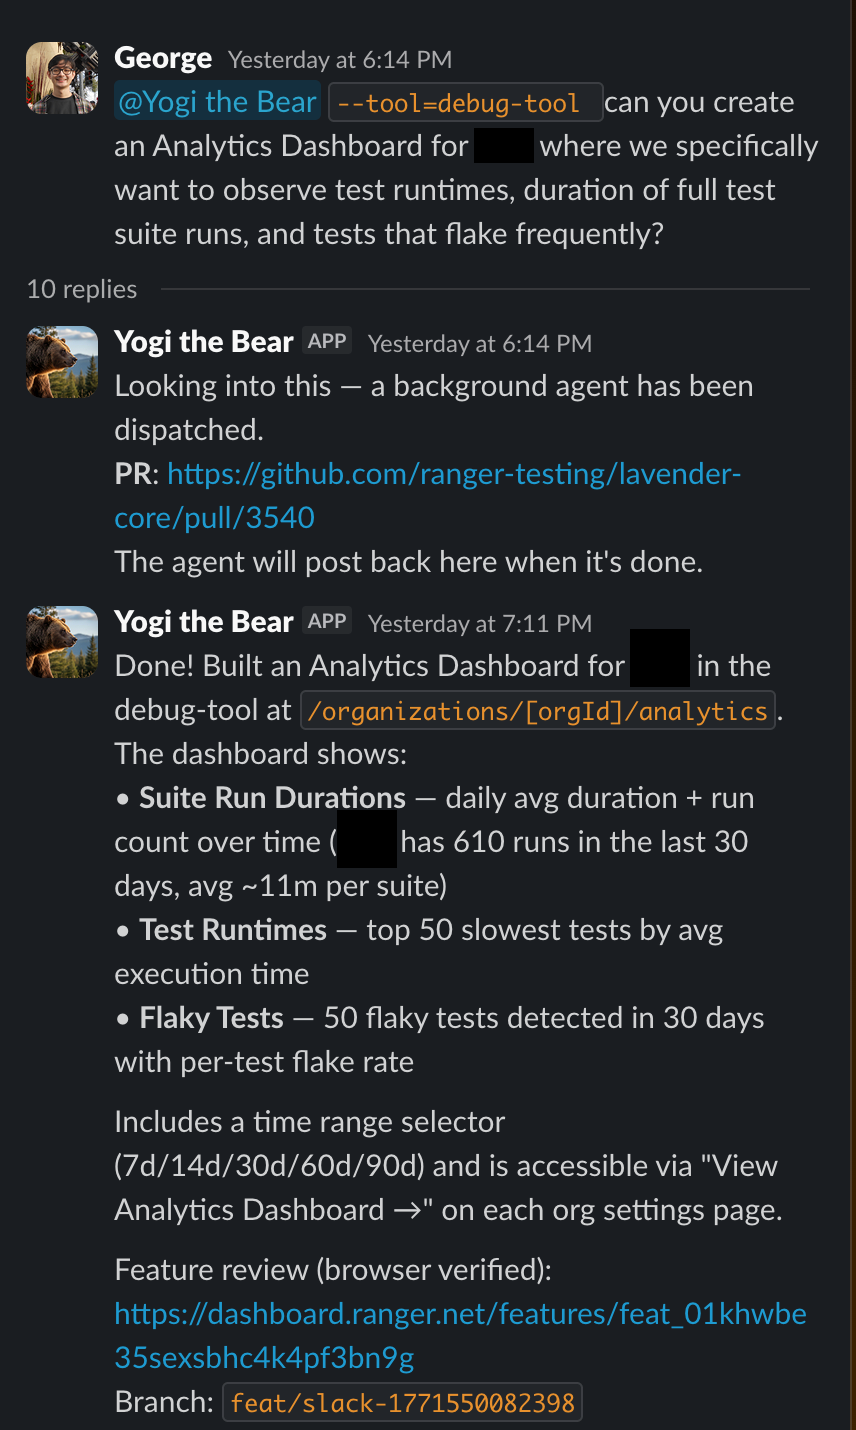
The agent has access to the codebase, can search logs, write code, and ship a fix. The entire team becomes capable of shipping.
Part 8: Ranger CLI — Feature Review for Non-Technical Stakeholders
Here’s the final piece: how do non-engineers verify the agent did the right thing?
We install Ranger CLI on every preview environment:
npm install -g @ranger-testing/ranger-cli
ranger start "${RANGER_CLI_TOKEN}"
ranger skillup  # Installs feature review skills
Ranger CLI adds a /feature-review skill to Claude Code. When the agent finishes a task, it can run an automated feature review:
- Spins up the preview environment in a real browser
- Walks through the feature step by step
- Takes screenshots at each step
- Posts a summary back to Slack with visual proof
The user who requested the feature sees:
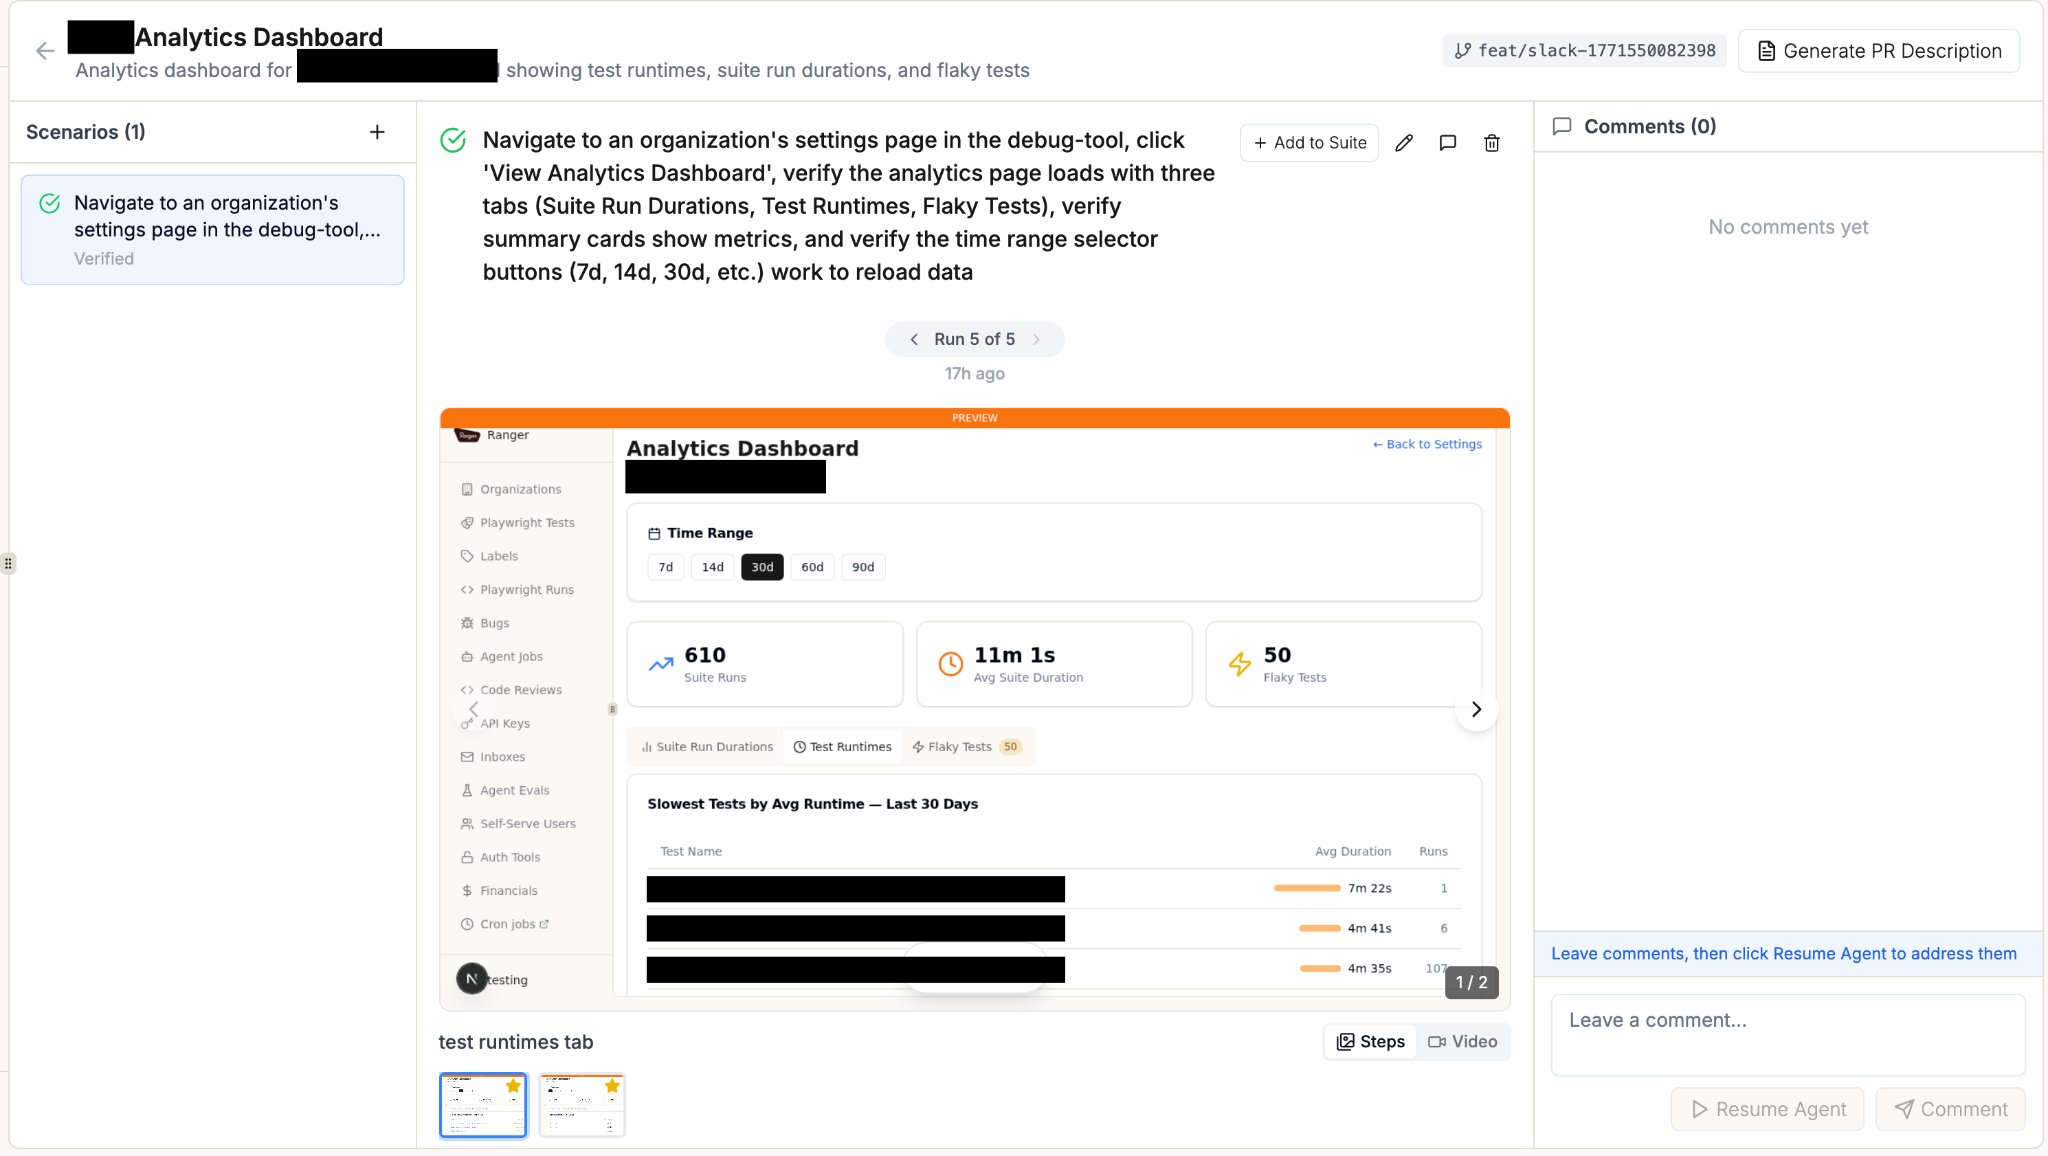
They can review the visual evidence without touching code, then approve the PR.
The Setup
# Install Ranger CLI
npm install -g @ranger-testing/ranger-cli

# Authenticate
ranger start "${RANGER_CLI_TOKEN}"

# Install Playwright for browser testing
npx playwright install chrome --with-deps

# Seed environment configs
mkdir -p .ranger/local/dashboard
echo '{"baseUrl": "http://localhost:4000"}' > .ranger/local/dashboard/settings.json

# Install skills (including feature-review)
ranger skillup
Now the agent can say /feature-review and get a verified, visual confirmation that the feature works.
Part 9: The Complete Flow
1. Anyone posts in Slack: "@yogi The settings icon needs a tooltip"

2. Slack bot creates draft PR:
   - Branch: feat/slack-1708300000
   - Title: "agent: The settings icon needs a tooltip"
   - Labels: preview, background-agent
   - Body: Full message with thread context

3. GitHub Actions workflow triggers:
   - Creates Neon database branch
   - Spins up a VM
   - Clones repo, checks out branch (with push perms via PAT)
   - Builds and starts services
   - Starts OpenCode

4. OpenCode kickoff:
   - Creates new session
   - Sends PR body as initial prompt
   - Agent reads code, implements feature, commits

5. Feature review:
   - Agent runs Ranger's /feature-review skill
   - Playwright opens browser, takes screenshots
   - Posts visual proof to Slack

6. Human review:
   - PM sees screenshots, approves
   - Engineer reviews code, merges
   - Done.
Total time from Slack message to verified, reviewed PR: 30-60 minutes.
Deployment: The Slack Bot Service
The bot itself runs on Cloud Run:
FROM node:25.1.0
WORKDIR /app
RUN npm install -g tsx@4.21.0
COPY src/slackBotService/package*.json ./
RUN npm install --omit=dev
COPY src/slackBotService/ ./
USER node
ENV PORT=3100
CMD ["tsx", "app.ts"]
gcloud run deploy slackbot-service \
--image gcr.io/${PROJECT}/slackbot:${SHA} \
--memory 512Mi \
--min-instances 1 \
--max-instances 1 \
--set-secrets="SLACK_BOT_TOKEN=...,GITHUB_TOKEN=..."Why max-instances=1? We use in-memory state to prevent duplicate dispatches per thread. A single instance keeps it simple.
What We Skipped (And You Can Too)
Things that sound important but aren’t:
- Kubernetes: Overkill. A single VM per preview is fine.
- Terraform: Nice to have, but gcloud commands in GitHub Actions work great.
- Custom auth system: IAP handles it. Don’t reinvent.
- Fancy queue system: The GitHub Actions workflow IS your queue.
- Monitoring dashboards:
gcloud loggingis enough to start. - Hot n’ Ready: Rather than having a pool of pre-running boxes ready to go, we spin them up when needed. While it means a ~3 minute start time, for kicking off background tasks the simplicity was worth not managing a hot pool.
The payoff? The entire team can ship features now. Not just file tickets. Actually ship.
And when an engineer opens a regular PR? They get the same preview environment, the same isolated database, the same live URL for teammates to test. The infrastructure pays dividends whether an agent wrote the code or a human did.
We’re not locked into any agent vendor. We can swap models, customize workflows, add approval gates, integrate with whatever tools we use. It’s just VMs, Docker, and shell scripts — the same primitives we’ve been using for years.
Start Simple. Add Complexity When You Need It.
It seems like a lot of steps but at the end of the day, it’s a small VM with a few environment variables and packages that has a proxy sitting in front of it. There are plenty of ways to make it better from here, but it’s already a game-changing experience. Don’t stop yourself from having it by making it more complex than it needs to be.
Total infrastructure: ~500 lines of YAML and bash. Value delivered: The whole team shipping features, not just engineers.
The code snippets above are from our actual system. It’s not more complicated than this. Reach out to eng@ranger.net if you have questions or thoughts you’d like to share.